Crafts

Paper Plate Seashell for Preschoolers

Looking for a seashell craft to do with your preschooler?  This paper plate seashell helps preschoolers with their fine motor skills and is really easy to make.  My son made this a while back in class a while back, but it is still one of my favorite summer crafts. 

You need 1) a hole puncher 2) a plain white paper plate and 3) scissors and 4) any color of yarn. 

Voila... You have a seashell!

Want more fun summer crafts and activities for tots, preschoolers, and older kids too?  Follow me on Pinterest.

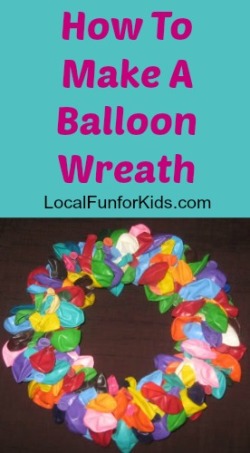
How to Make a Birthday Balloon Wreath

If you haven't yet made a balloon wreath, you have to make one! My sister and I made ours about a year and a half ago and I have used it so many times since then. When I first made the wreath, I wrote up a blog post with a balloon wreath tutorial and I'm excited to bring it to life again.

Balloon wreaths are incredibly easy to make. You don't need any special artistic talents or fancy materials. You just buy a few items at your local craft store and you can complete your wreath while chatting with friends and having a glass of wine.

Some of my friends and I have always wanted to do girls craft night, and this would be a perfect project for a fun get together.  These balloon wreaths are easy to customize for any occasion.  You can use your school colors, holiday colors, or anything else you fancy.  I like the plain ol' birthday balloon colors, because it's festive, colorful, and looks just as fun for my husband's birthday as it does for my 5-year-old.

Continue here to read: Easy Craft: How to Make a Balloon Wreath

Recycled Robot Preschool Craft Using Cereal Boxes

It always amazes me how much paper and plastic waste there is in modern packaging. Our many recycle bins are always overflowing and I'm pleasantly surprised when I see companies that make an effort to downsize their packages and reduce waste.  It's also nice to see more and more crafts for kids made with recycled products.

One thing we always have in our recycle bin is thin cardboard boxes and they seem to accumulate. My son came home from preschool one day with this really cute recycled robot craft. I have always been impressed with some of the art projects my son does at preschool.  This one is really easy and I love the results.

Craft Materials:

Top 10 Cinco de Mayo Crafts and Activities for Kids

 Do you ever find yourself looking for something on the internet and not find what you're looking for? That was how I felt while looking for easy kid's crafts and activities for Cinco de Mayo. I kept finding the same crafts over and over, but most of them were too difficult for kids or required too many materials. So, I did some research and searched for Cinco de Mayo crafts and activities for kids that were: fairly easy, good for a group, and didn't require too many materials.

Here are the Top 10 Cinco de Mayo Crafts and Activities for Kids:


1. Footprint Chili Pepper Cinco de Mayo Craft.

2. Easter Egg Maracas  made with plastic easter eggs and spoons.

3. Pinanta Garland made with recycled toilet paper rolls. I love these!!!

4. Mexican Flag Drinking Straw - You need red, green and write staws and a print out of the Mexican flag for this craft.

5. Printable Cinco de Mayo Activities for Kids - Lots of great Mexican themed printables here.

6. Saguaro Cacti Kid's Art  All you need is construction paper, rice, and some tissue paper.

7. Cinco de Mayo Mariachi Guitar Craft - These bright and colorful guitars would be ideal for 1st grade and up.

8. Chili Pepper Craft Just grab some red beads and a green pipe cleaner for this one!

9. Mexican Flag Cinco de Mayo Project - This simple craft will help teach kids about the Mexican Flag and would go great with a social studies lesson.

10. DIY Crepe Paper Flowers. You could modify this to make it easier for the age group you're working with.  For instance, let the kids color coffee filters and make your own DIY fiesta flowers. 

Do you have any Cinco de Mayo family traditions?

Easy Craft: Seashell Vacation Memory Jars

Family vacations seem to go by so fast, but I found a way to capture our memories and enjoy them for years to come.  It all started when we went to Ft. Meyers Beach, FL.

While we were in Ft. Meyers, Sanibel and Captiva, we found some amazing shells, a dried up starfish and even the shell of a mini sea urchin. They were so beautiful, I wanted a simple way to display them and remember our special moments. So, on a visit to IKEA, I bought a glass jar and carefully placed all of our treasures inside.

Then, on a family vacation to Cape Cod, we collected the smoothest rocks and some sand from the beach. I got a smaller glass (also from IKEA) and placed the rocks in the jar along with a little bit of sand from our trip.

When we recently went to Naples, FL and collected shells and a sea sponge that washed up on the beach, you know what I did with them, right?  Yep, I got another glass jar and gently placed our new treasures into the jar.  

There are moments when we look at the jars or open them up and re-inspect our collections. The kids and I  like to see and feel our trinkets and reminisce about our special moments on our family vacations. These memory jars are so easy to make and, in my opinion, are a million times better than anything from a souvenir shop.

Here's another one of my favorite crafts to use those little seashells from vacation:

Sand & Shell Ornament Craft for Kids

If you don't have any shells, here's an easy seashell crafts for kids using a paper plate:

Easy Preschool Paper Plate Seashell Craft

Do you do anything special to capture your special vacation memories?

How to make Cinnamon, Sugar & Salt Ornaments

Are you crafty?  I am always surprised by how many moms say they aren't crafty. It really is so easy to use things you have around the house to get crafty with your kids.  These salt dough, sugar and cinnamon ornaments are a perfect example. Even if they don't turn out perfect, it doesn't matter.  My son and I made cinnamon ornaments yesterday, and, they may not be perfect, but they still look great and we had a lot of fun making them!

How to Make Cinnamon Ornaments:

You need:

3/4 cup of Applesauce

- 1 bottle (4.12 ounces) of Cinnamon

Just put the cinnamon and apple sauce in a bowl and mix it up.  We found that mixing with a spoon doesn't cut it, you really need to get in there with your hands and make sure it's completley mixed into a firm, smooth ball of dough. Then, on a large flat cookie cheet, roll it with a rolling pin until it is about 1/4-inch to 1/3-inch thickness.  Use cookie cutter to make your shapes and use a wooden skewer to poke holes in the top (where you'll put the ribbon). If you feel like it's too stick roll it in a little more cinnamon.

Bake 2 1/2 hours at 200°F or lay the ornaments gently on a wire rack where they should be completely air dried in about 2 days.

Once they're dry you can decorate if you choose, or just leave them all natural.

How to Make Salt Dough Ornaments:

You will need:

1/2 cup of Salt

- 1 cup of Flour

- 1/2 cup of Water

- Glitter & Paint (to decorate)

Mix up the ingredients until they are the consistency of a bread or pizza dough.  If it feels too dry, add a little bit of water.  Or, if it seems too sticky, add a little more flour and salt (in equal parts).

Then, roll out flat on a cookie sheet to about 1/4 to 1/3-inch thickness. Use cookie cutters to make shapes and use a wooden skewer to poke holes in the top (where you'll put the ribbon). You can either leave your ornaments out  to air dry or bake them in the oven at 250 degrees until they harden. 

Once they are dry, you can paint them and decorate them any way you want.  If you don't want to paint them, mixing colored glitter into the clay makes it really pretty and adds some sparkle.  

How to Make Sugar Ornaments:

Sugar Ornaments are also really easy to make with things you have around the house.  They look great and are a very kid-friendly holiday craft.  

You will need:

- 1/2 cup Sugar

- 1 tablespoon Glitter

- 1 teaspoon of water

First mix up the sugar and the glitter.  Then, add in the water until it's all mixed in.

Let the kids fill the cookie cutter with the sugar mixture. Then, you should gently tap the ornament out of the cookie cutter onto a cookie sheet or plate.  Allow the sugar ornament to dry overnight.  When it's completely dry, just glue a ribbon on the back of the ornament. That's it!

Do you have any other creative ideas for easy homemade kid's ornaments?